How to contribute II: Creating a New Deployment
From Security Vision
After you have read How to contribute: Getting Started and How to contribute I: Wiki and References it is time to create your first deployment. This page will give detailed instructions how to do this.
Check if the Deployment is already in the Wiki[edit | ]
- To do this, you can check the deployments page, the country page, and the institution page
- If you cannot find the deployment on the deployment page, nor the respective country page, nor the respective institution, it is very likely that the deployment you want to add is not in the Wiki already.
Create New Deployment[edit | ]

- To create a new deployment navigate to the top left of your page, left click "Create new..." and then left click "New Deployment"
Give the Deployment a Title[edit | ]

- After left clicking "New Deployment" you will be promted to give the deployment a meaningful name. If the name of a deployment already exists, you will be sent to a form to edit that page instead.
- Our convention for deployment titles is: Product Type used by Main User in Location.
- For example : "Face Recognition used by U.S. Customs and Border Protection - Boston Logan International Airport"
- Make sure that there are no spelling mistakes in the page name, as this is difficult to change later on.
- After choosing a meaningful name for the deployment, left click "Create or edit"
Enter the Information of the Deployment[edit | ]
- After pressing on "Create or edit" the data entry form will open. Here fill in the relevant data.
- Following is a short description of each point. Most of them are quite self-explanatory.
General Information[edit | ]
- Information Certainty --> How certain is the infromation?
- We've organized the information we gathered into three tiers of certainty.
- "Documented" denotes facts solidly supported by reliable sources.
- "Rumored" encompasses information reported as potentially true but lacking confirmation.
- Lastly, "Speculative" pertains to deployments inferred from multiple factual pieces but lacking explicit confirmation.
- We've organized the information we gathered into three tiers of certainty.
- Source (citekey) --> enter the citation key generated in Zotero. Seperate several citations with a comma. Make sure that before you enter the citation key, the citation key is pinned in Zotero.
- Deployment status --> Choose whether the deployment is ongoing, concluded, planned or stopped.
- "stopped" deployments, which have been interrupted due to the intervention of a court or a watchdog for example,
- and deployments that have naturally "concluded", either as part of an experimentation, or because they have for example been replaced with other systems.
- Deployment Purpose
- Convention.
- Chose from the existing list. If you would like to add a new purpose, please make sure it does not fit in one of the definitions below, then contact the database administrator.
- You can add several purposes, for example Access Control, Crowd Management and Traffic Surveillance.
- Definitions. We distinguish the following purposes for which security vision systems are implemented:
- Access Control. Systems used to authenticate individuals who can access an area (whitelist) or who are banned from it (blacklist).
- Automated Payments. Systems using computer vision to connect to payment services.
- Border Control. Systems used to identify travelers at the border.
- Commercial Surveillance. Systems used to collect information and analyze customer behavior with the purpose of impacting sales.
- Crime Prevention. Systems used to prevent or discourage criminal behavior
- Criminal Investigations. Systems used after a crime has taken place in the context of criminal investigation (for example to identify individuals).
- Crowd Management. Systems to gain insights on crowds and collective behaviour of people.
- Fraud Prevention. Systems aimed at preventing fraud.
- Fugitive Detection. Systems aimed at identifying fugitives from prisons.
- Health Surveillance. Systems aimed at detecting diseases (through thermal monitoring) and/or the application of health measures (covid-19 mask detection for example).
- Labor Surveillance. Systems aimed at detecting absenteeism from work.
- Missing Person Recovery. Systems aimed at identifying missing persons.
- Political Surveillance. Systems aimed at exercising political control over specific individuals.
- Refugee Identification. Systems aimed at identifying refugees.
- Student Surveillance. Systems aimed at detecting absenteeism from school or university.
- Surveillance. Systems generally aimed at identifying and tracking individuals.
- Targeted Advertising. A specific type of commercial surveillance, aimed at serving targeted advertisement to identified individuals.
- Traffic Surveillance. Systems aimed at detecting traffic issues.
- Voter & ID Registration. Systems aimed at identifying citizens or voters as part of national registries.
- War Operations. Systems aimed at identifying individuals or other forms of control in the context of conflicts.
- Convention.
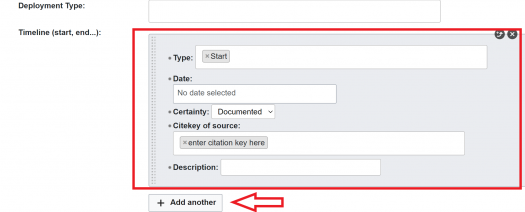
- Timeline --> Left click "Add another". A little grey box should appear (see below)
- Choose type "Start" for the beginning of the deployment.
- Enter the respective date and the certainty of the information
- Additionally, also enter the citekey of the sources (make sure they are pinned in Zotero)
- You can choose to give a short description about the start and the end of the deployment. (not mandatory)
- To create the end of the deployment left click "Add another" and repeat the steps above just choose the type "End".

- City --> Insert the city where the deployment is taking place.
- If the city is already existent in the Wiki it will appear in the dropdown menu, otherwise just type the whole city name into the field.
- Convention.
- Cities with unique or unambiguous names can be entered using only their name. Examples: Paris, Venice, Beijing
- Cities in the US are always followed by their two-letter state abbreviation in parenthesis. This helps disambiguation from other cities. Examples: Los Angeles (CA), Venice (FL), Milan (MI)
- The full list of standard abbreviations can be found here (please use the ANSI code)
- Cities with ambiguous names outside the US should be followed by their country three-letter abbreviation, in parenthesis. Examples: Bridgetown (BRB), Georgetown (GUY).
- The full list of standard abbreviations can be found here.
Management[edit | ]
- Managed by (Custodian) --> Enter the name of the institution that manages the deployment.
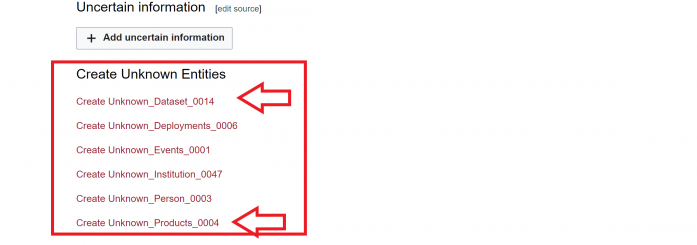
- If this is unknown, create an unknown instutions by pressing the red link under it. See image above for reference. Follow the conventions and definitions to create an Institution here
- Then enter "Unknown_Institution_####" with the #### representing the number of the unknown institution that you just created.

Users[edit | ]
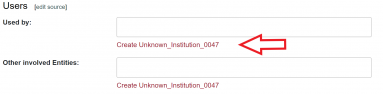
- Used by --> Enter the name of the institution that is the user of the deployment.
- If this is unknown follow the same steps to create an unknown institution that are outlined above.
- Other involved entities --> Enter the name of other involved instutitons
- Only enter this if there are other institutions involved, if not leave it empty.
- If you know that there are other institutions involved but you do not know their name, follow the steps above to create an unknown institution.
Technical Details[edit | ]
- Dataset used --> enter the name of the dataset that is used in this deployment.
- If this is unknown, create an unknown dataset.
- To do this, go to Unknown Entities and click the red link "Unknown_Dataset_####" (see picture below)
- This will bring you to a new page, promting you to create an unknown dataset.
- Enter "Unknown_Dataset_####" (#### = the number of the unknown dataset that you created) into the dataset field.
- Software used --> enter the name of the software that is used in this deployment.

Summary[edit | ]
- Convention.
- Try to limit the summary to 50-100 words, with the key information about the deployment, answering the following usual questions: who is deploying what, where and when and for what purpose.
Uncertain Information[edit | ]
- If there is information that you are not certain about, left click the button " + Add uncertain information"
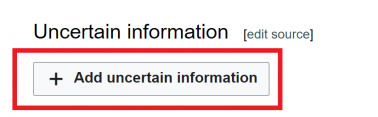
- After clicking this botton a grey box appears in which you can select to input uncertain information.
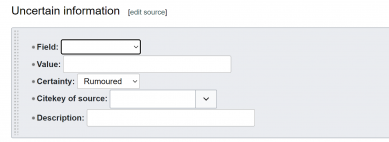
- Use the dropdown menu to determine which field you want to add as uncertain information.
- If you want to add more uncertain information, repeat the steps above.
- Make sure that the citekey of the sources is pinned in Zotero.


Enter Free Text[edit | ]
- To have a quick overview over the deployment, it is good to put in a small summary and some free text. The free text can be populated with informative quotes from relevant articles.
- Quotes should be clearly distinguish from own contributions. To do this follow the best practice guidelines.
- This means quotes are always in a blockquote format with a reference at the end.
- A blockquote with a reference looks like this:
This is a blockquote with a reference 1
- There are several ways to make text appear in the blockquote format.
Mark Up Language[edit | ]
- One of the quickest ways is to use markup language to determine which parts are part of the blockquote and to insert the citation key. An example is seen below.
- To do this put "<blockquote>" in the beginning of the quote and "</blockquote" at the end of the quote.
- Additionally, put "[[CiteRef::" at the beginning of the citation key and ]]" at the end.
Text Editor on the Edit Page[edit | ]
- You can also use the build in text editor of the Wiki
- To do this, copy and paste the sections from the article into the "Free Text" field.
- Scroll down all the way, and left click the blue button "Save Page"
- Then click the three dots next to the pen and paper symbol in the top right corner.
- Left click "Edit". This opens the edit page for the deployment you want to enter into the Wiki
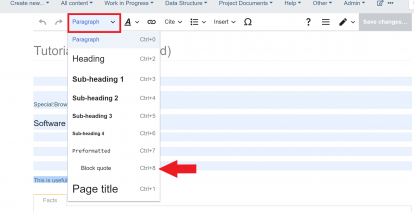
- On the edit page, scroll down to the copy pasted text from the article and highlight it.
- Then you can either press cntrl + 8 or pick "blockquote" from the text editor drop down menu. An example is seen below.
- Use this format for references: [[CiteRef::citationKeyZotero]]
- This is the same as using mark up language.
- Make sure that the citation key is pinned in Zotero.

Saving the Page[edit | ]
- To save the page scroll all the way down and press the blue button labeld "Save Page"

You can find a summarized version of this page, as well as conventions and definitions for all other pages in the wiki on How to contribute IV: Definitions and Conventions. Before that, you may wonder where to get information. Then read the next chapter of this guide: How to contribute III: Finding Information.
References
- ^ TestReferenceCitationKey